Best & Easy Crochet Granny Stitch Halter Top Pattern For Fashion
Refine your summer look with a chic crochet granny stitch halter top pattern reshape your wardrobe into a masterpiece of handmade charm.
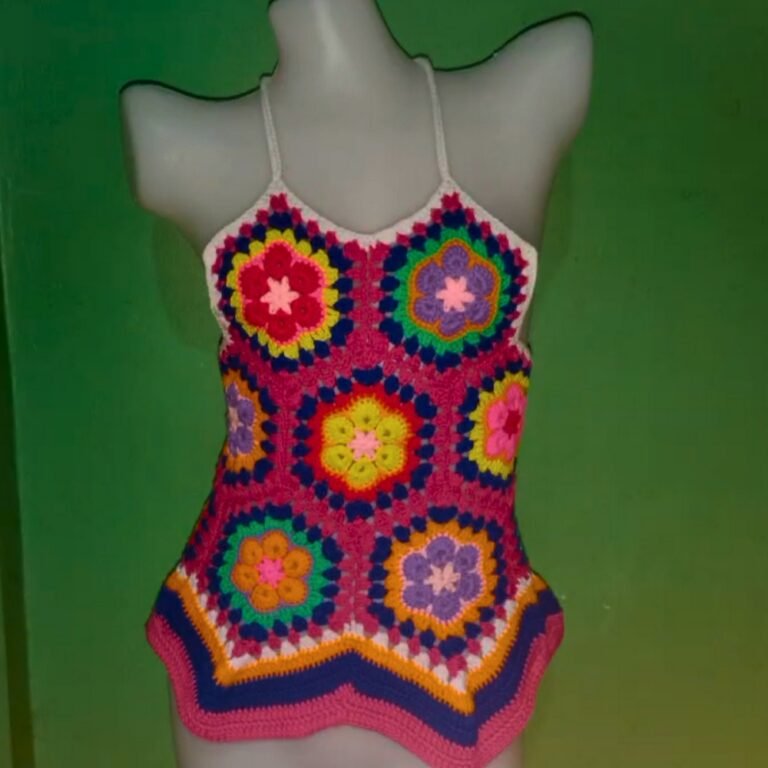
Turn heads this summer with the stylish Crochet Granny Stitch Halter Top, a pattern that combines timeless charm with effortless versatility. Perfect for warm, sunny days, this halter top is designed to keep you cool while making a bold fashion statement. Its classic granny stitch gives a beautiful texture and adds a touch of character to your handmade wardrobe.
Stand Out in Style Crochet Granny Stitch Halter Top

Whether you pair it with high-waisted shorts, or layer it under a light jacket, this top fits seamlessly into any casual outfit. Beyond its striking appearance, the pattern is beginner-friendly and allows makers to customize colors, sizing, and details with ease. The sturdy yet lightweight crochet style ensures durability and comfort, making it a practical choice for everyday wear.
Crocheting this halter top isn’t just a creative pursuit it’s an experience that promotes mindfulness, relaxation, and personal satisfaction. With each stitch, you’re building something unique that reflects your taste and effort. This Granny Stitch Halter Top is not just a garment; it is a celebration of self-expression and a reminder of the beauty in handmade treasures.
Introduction:
In this pattern, the creator demonstrates how to crochet a stylish halter top using leftover yarn with the granny stitch pattern. The granny stitch, a classic crochet technique that involves clusters of double crochets, adds a timeless and visually appealing design to the top. Using basic crochet techniques like chains, double crochets, single crochets, decreases, and strap-making are used to complete the project. The final product is an easy-to-follow, customizable halter top that is both sustainable and fashionable.
1. Preparation
- Materials Needed:
- Leftover yarn (two colors: green and white are used in this example).
- A 2.5 mm crochet hook.
- Scissors.

2. Creating the Foundation Chain
- Start by making a slip knot.
- Create chains equivalent to your high waist measurement minus 5 inches. For instance:
- In this project, the stretched chains measured 21 inches (slightly stretched, but don’t overstretch).

3. Row 1: Starting the Granny Stitch
- Step 1: Yarn over and make three double crochets (a cluster) in the third chain from the hook.
- Step 2: Chain one, skip two chains, and make another cluster of three double crochets in the third chain.
- Repeat: Continue creating granny stitch clusters by skipping two chains and working three double crochets in the third chain until the end of the row.

4. Row 2: Continuing the Granny Stitch Pattern
- Step 1: Chain three and turn your work.
- Step 2: Make three double crochets in each chain space created by the granny stitch clusters in the previous row.
- Repeat: Continue the granny stitch pattern across the row:
- Ensure you skip the groups of clusters and only crochet into the chain spaces between them.
- Tip: Chain three at the start of each row—it acts as your first double crochet.
5. Working Rows Without Increase/Decrease
- Repeat the granny stitch pattern for subsequent rows for 2.5–3 inches (or adjust based on your preference for the overall top length before shaping).
- Example: For high-waisted tops, crochet rows up to 3 inches before decreasing.
6. Adding Decreases (Shaping the Halter Top)
- The creator transitions into shaping the top by using decreases:
- At the beginning of a row: Skip the first chain space and begin granny stitch clusters in the next chain space.
- At the end of a row: Replace the standard granny stitch cluster (three double crochets) in the last chain space with a single double crochet.
- Continue decreasing rows until the top measures around 8 inches in height, creating a tapered shape perfect for a halter top.
7. Switching Yarn Colors (Optional)
- To enhance the design, the creator alternates yarn colors (green and white in this example):
- Introduce a new color by attaching it using a slip knot and beginning the next row normally.
- Example Color Pattern:
- Crochet 8 rows of green, then switch to 8 rows of white, and finish with 9 rows of green.
- Tip: This step is optional and can be customized to fit your preferred style.
8. Adding Side Edging (Finishing Touches)
- For a clean and polished finish, single crochets are added along the edges:
- Attach yarn to the corner.
- Work two single crochets into each row along the side of the halter top to create a neat border.
- At the corner, chain one before proceeding.
9. Creating Straps
- Cut multiple strands of yarn to create straps (e.g., 60 inches long for each strap, adjustable based on personal preference).
- Attach the straps to the top:
- Insert the crochet hook through the top corner and pull one folded yarn strand through, creating a secure knot.
- Repeat the process for the second strap.
- Chain stitch the straps if needed for extra support.

10. Final Touches
- Double-check the dimensions, color transitions, and strap placement.
- Ensure the granny stitch pattern is consistent across the top for a clean finish.

Conclusion
This halter top pattern showcases the versatility of the granny stitch pattern, which is perfect for beginners and experienced crochet enthusiasts alike. By using leftover yarn and basic crochet techniques, the project creates a trendy, lightweight design that can be worn during warm weather. The granny stitch offers both style and practicality, as it is easy to work with and creates a breathable fabric.