Festive Crochet Granny Square Ornament Pattern For Christmas Cheer
Light up your holidays with this festive crochet granny square ornament pattern, bringing cozy charm and Christmas cheer to your decorations!
Holiday decorations don’t just add visual beauty they tell a story of warmth, tradition, and personal connection. The Crochet Granny Square Ornament takes this idea to heart by transforming the classic granny square design into charming ornaments perfect for the Christmas season. These versatile pieces can brighten up your tree, form colorful garlands, or even serve as eye-catching accents on wrapped gifts. With a simple yet imaginative approach, they provide endless opportunities to infuse your holiday decor with cozy, handmade flair.
Seasonal Style Crochet Granny Square Ornament Pattern

Easy to customize with your favorite seasonal colors and quick to complete, these ornaments suit both beginners and experienced crocheters. The small, manageable size makes them great for gifting or decorating on short notice, while their reusable nature contributes to eco-friendly holiday traditions. By incorporating these crochet ornaments, you’re not just adding decorations you’re creating meaningful moments and timeless keepsakes that reflect the joy of the season.
Whether shared with loved ones or displayed in your home, these handmade ornaments celebrate the holidays in a way that’s both heartfelt and sustainable. Their charm lies in the individuality of each piece, making your celebrations uniquely yours and ensuring that every stitch holds a little extra holiday magic.
Introduction
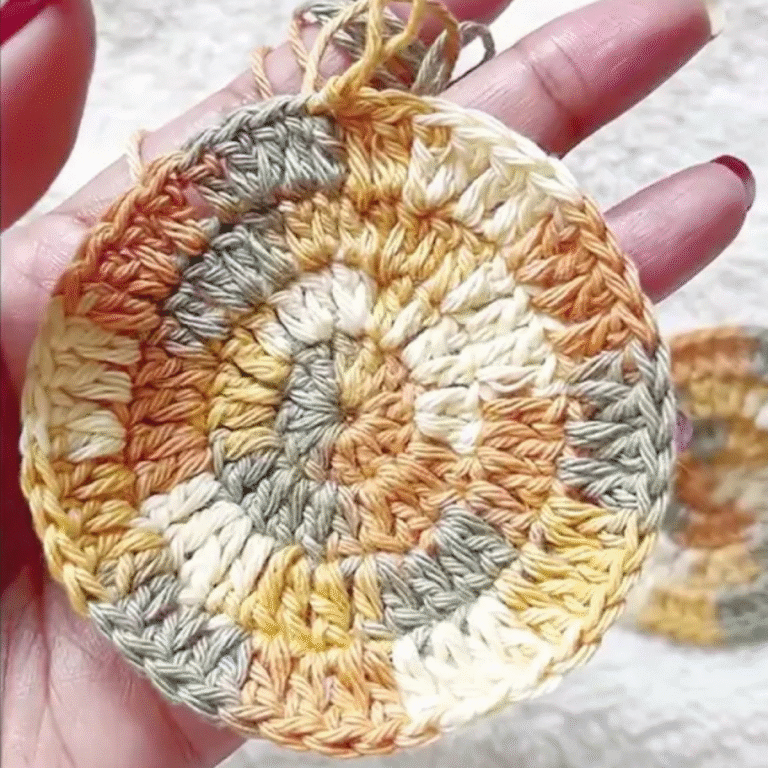
These handmade ornaments are quick, easy to crochet, and perfect for decorating your Christmas tree or gifting during the holiday season. The project uses sparkly yarn to add an extra festive touch, making the ornament reflect beautifully in the Christmas tree lights. Designed with two granny square-style pieces, this ornament encases a flat plastic ornament inside, ensuring it won’t break easily if dropped. Whether you’re a beginner or experienced in crochet, this step-by-step guide makes the process fun and accessible.
Materials Needed
To complete this project, you’ll need the following:
- 5 mm crochet hook
- 80 mm flat plastic ornament
- Scissors
- Yarn of your choice (sparkly yarn is highly recommended for a festive look)
- Yarn needle

1: Creating the Magic Ring
- Start a Magic Ring: Wrap your yarn around, pinch it, and pull through to form a circle.
- Chain 3: Begin by chaining three stitches.

- Work 15 Double Crochets: Count the starter chain as the first stitch, and crochet an additional 15 double crochets into the ring. This will give you a total of 16 double crochets when complete.
- Close the Circle: Pull the center of your magic ring tight and slip stitch into the top of the starting chain.
2: Adding Puff Stitches
- Chain 2: After completing the double crochet circle, chain two to start the puff stitch row.
- Create Puff Stitches:
- Yarn over and insert your hook into the stitch.
- Pull through, and repeat the process until you have five loops on the hook.
- Yarn over one last time and pull through all five loops.
- Chain one to secure the puff stitch.
- Repeat: Work puff stitches into each double crochet stitch around the circle. You should complete 16 puff stitches in total.
- Slip Stitch: Once you’ve finished, slip stitch into the top of the starting chain.

3: Adding Bobble Stitches
- Create a Bobble:
- Chain two.
- Insert your hook into the chain space between puff stitches and work three incomplete double crochets (pull through two loops but leave the last loop on the hook each time).
- Pull through all loops and chain two.
- Repeat Around: Continue creating bobble stitches in the chain spaces between puff stitches, each time chaining two.
- Finish the Second Side: After completing the circle, slip stitch into the starting chain and fasten off, leaving a tail for assembly.

4: Make the Second Granny Square
Repeat steps 1 through 3 to create an identical granny square. However, do not fasten off or cut your yarn at the end – this will be used to sew the ornament together.
5: Assembling the Ornament
- Prepare the Squares: Place the two granny squares together, with the correct (outer) sides facing outward.
- Align Stitches: Match the spaces between stitches from the front and back squares.
- Single Crochet the Edges: Insert your hook into the back loop of the front square and the back loop of the back square, and single crochet around the edges to join them. Leave an opening large enough to insert the ornament.
- Insert Ornament: Carefully insert the flat plastic ornament into the joined crochet piece.
- Close the Opening: Using the tail from your crochet piece, sew the remaining edge closed using a yarn needle.

6: Finishing Touches
- Tie Off Loose Ends: Weave in any loose ends using your yarn needle.
- Add Hanging String: You can either use jute, ribbon, or yarn to create a loop for hanging the ornament. Simply tie the string to the top and secure it with a knot.
Conclusion
Your Crochet Christmas Granny Square Ornament is now complete! This adorable and handmade decoration is a perfect addition to your Christmas tree, a sweet neighborly gift, or a creative touch for wrapping holiday presents. With endless customization options such as different yarn colors or textures, you can easily crochet ornaments that suit your aesthetic or match your holiday decor.