Mini Crochet Strawberry Keychain Pattern – DIY Gift Inspiration
Spark some fruity fun with this Mini Crochet Strawberry Keychain pattern cute, quirky, and the perfect pop of sweetness for your keys or bag!
Small wonders often leave the biggest impressions, and the Mini Crochet Strawberry Keychain is a perfect example. This delightful accessory, shaped like a plump, vibrant strawberry, serves as more than just decoration it’s a functional piece of charm that carries a touch of whimsy wherever it goes. Whether clipped to your keys, backpack, or purse, its cheerful design adds personality to everyday items while ensuring you never lose track of them.
Charming Crochet Strawberry Keychain Pattern for Everyday Use

Perfect for beginners and seasoned crocheters alike, this pattern lets you transform simple materials into something truly special. Its small size makes it an ideal weekend project, while its unique design opens up countless possibilities for customization—choose bold hues, pastel shades, or even add beads to make it uniquely yours. The Mini Crochet Strawberry Keychain also makes a heartfelt gift, spreading joy to friends and family with its handmade appeal.
Beyond aesthetics, its lightweight nature and durable construction make it practical for daily use, ensuring it’s both stylish and reliable. Whether you’re accessorizing on the go or looking for a creative way to express yourself, this charming little keychain is sure to bring smiles while showcasing your appreciation for detail and artistry.
Introduction
This crochet pattern uses an amigurumi approach to create an adorable strawberry keychain. It includes a delicate red strawberry body, embroidered white seeds, and a charming green stem with leafy details. The design is versatile and beginner-friendly, with detailed instructions to guide you through the process. Whether making it as a gift or for personal use, this keychain adds a handmade touch to your accessories.
Materials Needed
- Yarn
- 4-ply cotton yarn in red (for the strawberry body)
- 4-ply cotton yarn in green (for the stem and leaves)
- A small amount of white yarn (recommend using 1-ply for embroidery; can be separated from 4-ply cotton).
- Tools
- 1.9 mm crochet hook (or adjust to 3 mm depending on preference).
- Scissors.
- Stitch marker (optional).
- Fiber filling for stuffing.
- Yarn needle (use a finer needle for the white embroidery).
- Pins for positioning the stem and leaves.

Step 1: Crochet the Strawberry Body
Round-by-Round Instructions
- Round 1:
- Begin with a magic ring.
- Crochet 6 single crochet stitches into the ring.
- Pull the tail of the ring tight to close the gap.

- Round 2:
- Work in a spiral without slip stitches.
- Pattern: Alternate 1 single crochet stitch with 1 increase (2 single crochet stitches in the same stitch).
- Repeat three times for a total of 9 stitches.
- Round 3:
- Pattern: 2 single crochet stitches followed by 1 increase.
- Repeat three times for a total of 12 stitches.
- Round 4:
- Pattern: 3 single crochet stitches followed by 1 increase.
- Repeat four times for a total of 16 stitches.
- Round 5:
- Pattern: 4 single crochet stitches and 1 increase.
- Repeat four times for a total of 20 stitches.
- Round 6:
- Work 20 single crochet stitches around without any increases.
- Round 7:
- Pattern: 5 single crochet stitches and 1 increase.
- Repeat four times for a total of 24 stitches.
- Rounds 8 and 9:
- Work 24 single crochet stitches without increases for both rounds.
- Round 10 (Start Decreasing):
- Pattern: Work 4 single crochet stitches, followed by 1 invisible decrease.
- Repeat four times for a total of 20 stitches.
- Round 11:
- Pattern: Work 3 single crochet stitches followed by 1 invisible decrease.
- Repeat four times for a total of 16 stitches.
- Round 12:
- Pattern: Work 2 single crochet stitches followed by 1 invisible decrease.
- Repeat four times for a total of 12 stitches.
Add Fiber Filling
At the end of Round 12, fill the strawberry with fiber filling to give it shape. Use a pair of cutters or other tools to pack the filling tightly inside while maintaining the round form.
- Round 13 (Closing the Strawberry):
- Work 5 invisible decreases evenly spaced around.
- Slip stitch to finish.
- Leave a yarn tail of about 10 cm to close the gap using a yarn needle.

Final Seamless Closure
Use the yarn needle to sew through the front loops of the remaining stitches and pull tight to close the gap without bumps or lumps. Secure the yarn tail by weaving it into the strawberry body several times before cutting it off.
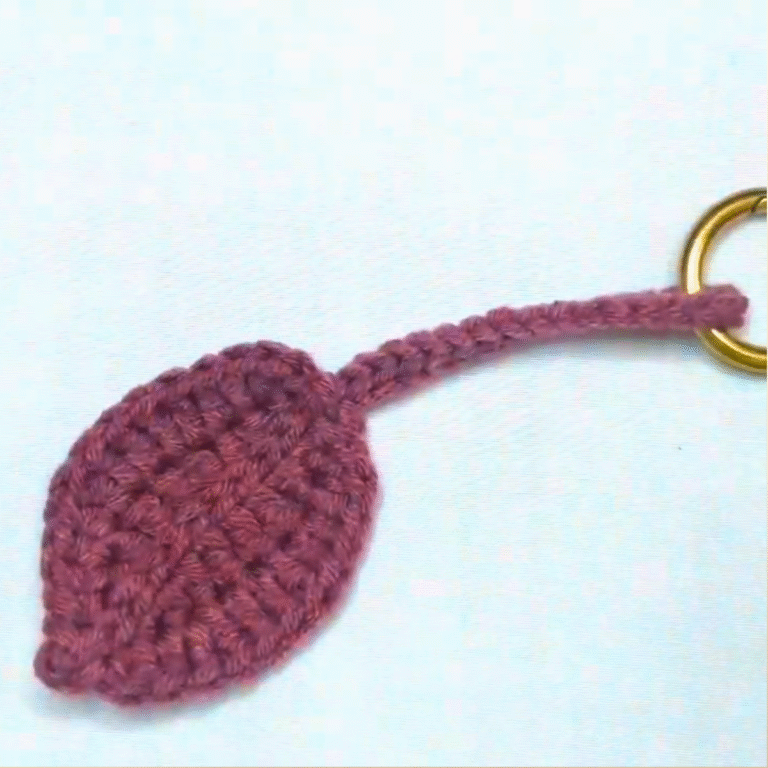
Step 2: Crochet the Stem and Leaves
Instructions for the Stem
- Begin with a magic ring and crochet 5 single crochet stitches into it.
- Work in spiral rounds.
- Round 2: Crochet 5 single crochet stitches.
- (Optional) Add Round 3 for a longer stem by repeating 5 single crochet stitches.
- Slip stitch to finish the stem and leave a long tail for sewing.
Instructions for the Leaves
- Start with the completed stem.
- Chain 6 stitches.
- Work the following stitches down the chain:
- Slip stitch in the second chain from the hook.
- Single crochet in the next chain.
- Half-double crochet in the next chain (widest point).
- Single crochet in the next chain.
- Slip stitch in the last chain.
- Work the following stitches down the chain:
- Attach the leaf to the base of the stem with a slip stitch.
- Repeat the pattern for a total of 5 or 6 leaves, depending on preference.

Step 3: Embroider the White Seeds
- Cut the white cotton yarn into a 40 cm length.
- Use a fine needle for embroidery.
- Secure the yarn into the strawberry body and begin sewing small lines in a straight-down motion, spacing each stitch every 2–3 rounds of the strawberry body.
- Continue embroidering white seeds evenly, distributing them across the entire strawberry.
- Tie a knot at the end and tuck it into the body to hide it.
Step 4: Attach the Stem to the Strawberry
- Position the green stem and leaves at the top of the strawberry, centering the stalk.
- Use pins to hold it in place while sewing for symmetry.
- Use the long tail left on the stem to sew it securely to the strawberry, stitching down the base and around each individual leaf.
- Weave the yarn tail into the body several times to secure, then trim the excess.

Conclusion
Congratulations! You’ve completed your crochet strawberry keychain. This adorable creation is perfect as a decorative element, an accessory, or a handmade gift. You can experiment with variations, such as adding thicker white yarn for seeds or adjusting the number of leaves.