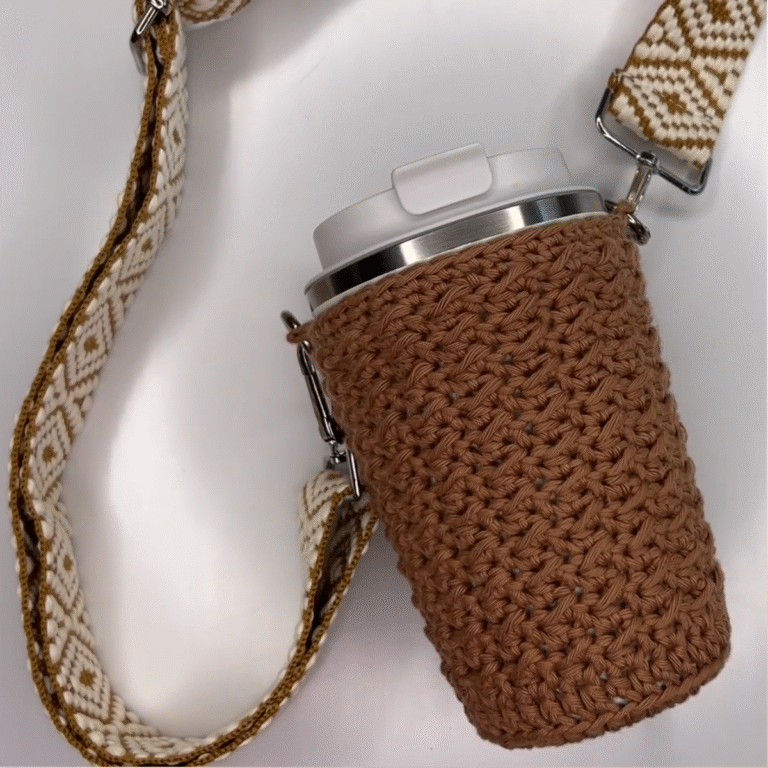
Sip in Style Crochet Snowball Fight Cup Cozy Pattern For Hot Drink
Maintain cozy hands and elevate your drink’s style with the Crochet Snowball Fight Cup Cozy your winter must-have for hot beverages!
Cold weather often calls for a warm drink to ward off the chill, but holding a hot cup can sometimes be uncomfortable. The Crochet Snowball Fight Cup Cozy Pattern is here to solve that problem with a practical yet delightful solution. Designed to protect your hands while adding a charming touch to your beverages, this crochet cup cozy is an excellent addition to your winter essentials.
Winter Drink Accessory Crochet Snowball Fight Cup Cozy Pattern – Free

Its unique snowball-inspired texture not only keeps your fingers safe from the heat but also prevents annoying condensation from messing up your tabletops. Whether you’re enjoying coffee, tea, or hot cocoa, this cozy offers comfort and style in equal measure. It’s also an ideal gift option for loved ones, adding a personal and handmade touch to their daily routines.
Perfect for beginners and seasoned crochet enthusiasts alike, this pattern is a wonderful way to create something both functional and artistic. Say goodbye to burned hands and hello to cozy sipping moments. With the Crochet Snowball Fight Cup Cozy every drink becomes a little more enjoyable, blending warmth, charm, and practicality in one cute package.
Introduction
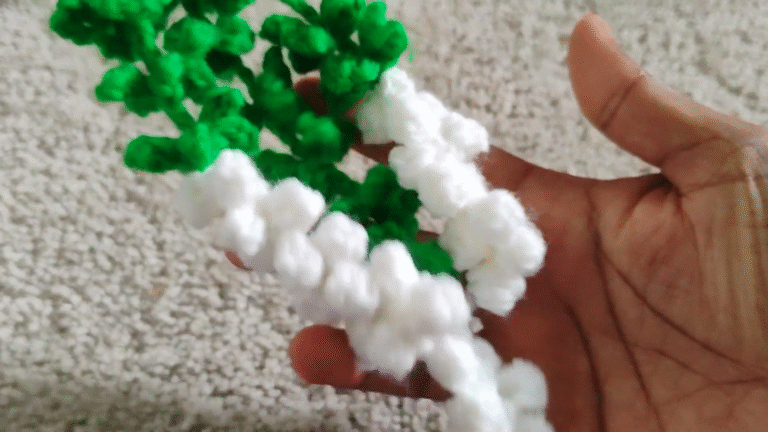
This crochet pattern is perfect for keeping your drinks warm while adding a unique winter charm! Featuring alternating stitches and textured designs inspired by snowballs, this drink cozy is both practical and decorative. In this tutorial, you’ll learn how to crochet this cozy step-by-step using simple techniques such as single crochet, berry stitches, double crochet, and more.
Materials Needed
- Size 4 worsted weight yarn (any color; shown using Red Heart Super Saver in Frosty Green)
- 3.75 mm hook (size F crochet hook)
- Scissors
- Yarn needle
- Stitch marker (optional)

Step-by-Step Instructions
Round 1: Starting the Base
- Begin with a magic circle. (If you’re unfamiliar, reference the creator’s other video for learning magic circles.)
- Insert 6 single crochets into the magic circle.
- Tighten the circle to close the hole.

Round 2: First Increase
- Add 2 single crochets into each stitch around.
- Count up to 12 stitches total.
Round 3: Continuing Increases
- Work 2 single crochets into the first stitch, then 1 single crochet into the next stitch.
- Repeat this pattern all the way around.
- End with 18 stitches.
Rounds 4–6: More Increases
- For each successive round:
- Round 4: 2 single crochets into the first stitch, 1 single crochet into the next two stitches (total 24 stitches).
- Round 5: 2 single crochets into the first stitch, 1 single crochet into the next three stitches (total 30 stitches).
- Round 6: 2 single crochets into the first stitch, 1 single crochet into the next four stitches (total 36 stitches).
Round 7: Forming the Base Edge
- Work single crochet in back loops only for one round.
- Place stitch markers if needed to help track the start and end of rounds.

Round 8: Alternating Single Crochet and Berry Stitches
- Slip stitch into the next stitch and chain 1.
- Begin this round using a pattern of single crochet followed by berry stitch:
- To create a berry stitch:
- Insert hook into stitch, pull up a loop.
- Chain 4, then pull the loop through the others on your hook.
- Alternate with single crochet in each subsequent stitch.
- To create a berry stitch:
Round 9: Reversing the Berry Stitch Sequence
- Chain 1 to start.
- Alternate berry stitch first, followed by single crochet.
- Maintain stitch sequence until the end of the round.
Round 10: Single Crochet Round
- Chain 1, then work single crochet into each stitch around.
- End with a slip stitch.
Rounds 11–12: Cluster Stitch Design
Round 11:
- Begin with chain 3.
- Work 2 double crochets into the same stitch.
- Skip 2 stitches, then place 3 double crochets into the third stitch.
- Repeat around and end with a slip stitch.
Round 12:
- Chain 3 to start again.
- Work 3 double crochets into each space from the previous round instead of stitches.
- Finish the round following the same placement structure.

Round 13: Alternating Berry Stitches
- Repeat the berry stitch and single crochet sequence as described earlier.
Round 14: Double Crochet Together Pattern
- Begin with chain 2 and start by creating a Double Crochet 2 Together stitch:
- Yarn over, insert hook into next stitch, pull up a loop.
- Yarn over, pull through 2 loops.
- Repeat the above step for the next stitch.
- Yarn over and pull through all 3 loops.
- Chain 2 after this.
- Continue with Double Crochet 3 Together stitches for the remainder of the round.
Round 15: Working into Spaces
- Repeat the above Double Crochet 3 Together stitches, but work directly into the chain spaces rather than stitches.
- Alternate spaces, chain 2, and clusters throughout the round.
Final Rounds: Clean Finish
Round 16:
- Work a single crochet round.
- Add 2 single crochets into chain spaces where cluster stitches were made.
- Use a slip stitch to finish.
Round 17:
- Alternate another berry stitch and single crochet sequence.
- End with a slip stitch.
Round 18:
- Repeat the berry stitch-first sequence followed by single crochet.
Final Round:
- Work a clean round of single crochets.
- Finish with slip stitch and cut the yarn.
- Use a yarn needle for weaving in and securing ends.

Finishing Details
- Pull the yarn taut after cutting.
- Weave all loose ends securely into the body of the cozy using a yarn needle.
- Ensure the edges look seamless and tight.
- After finishing, optionally knot the magic circle tail for durability.
Conclusion
Your Crochet Snowball Fight Drink Cozy is ready to use or gift! This unique design perfectly captures the spirit of winter with fun berry stitches and textured layers. Its practicality and cheerful look make it a delightful addition to any drinkware.