Unique Crochet Halter Top Pattern for Fashionistas
Radiate effortless charm with crochet halter top pattern—where style meets individuality, creating timeless pieces perfect for any occasion.
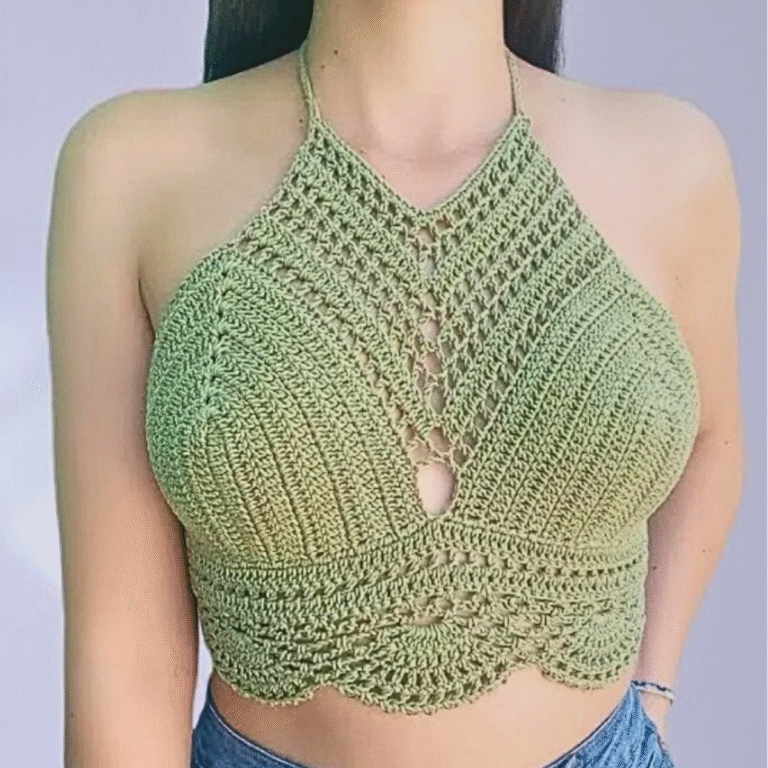
Once cherished as a timeless wardrobe staple, the halter top gets a new twist with hand-woven charm. These trendy tops, stitched from delicate yarn, are perfect for enhancing your summer style or for layering during cooler months. Each stitch combines functionality with fashion, delivering one-of-a-kind pieces that reflect your individuality. Comfortable yet chic, they are lightweight and breathable, ideal for beach days, music festivals, and casual outings.
Must-Try Crochet Halter Top Pattern for Summer Fun

Handmade halter top also allow wearers to personalize their look, choosing colors, embellishments, or textures that speak to their taste. Beyond their aesthetic appeal, they offer practical benefits such as durability and sustainability by minimizing waste. These tops work beautifully as swimwear covers, paired with high-waisted trousers, or styled under denim jackets for a trendy day-to-night look.
For crafters, creating one provides a relaxing outlet while introducing valuable skills to design garments that last. With endless possibilities to innovate, every design offers an opportunity to enhance your wardrobe with a touch of authenticity. Whether you’re gifting one or wearing it yourself, these elegant pieces bring a delightful handmade touch to modern fashion while elevating your personal style in a truly unique way.
![]()
Step-by-Step Guide to the Crochet Top Transformation from the Video
Below, I’ve compiled all the relevant details from the video, organized into sections with headings, for clarity. This will describe the tutorial, its features, uses, materials, and noteworthy tips, complete with an introduction and conclusion.
Introduction
In this video, Kendyl demonstrates how to transform a simple crochet top into a stylish and supportive summer piece. The project stands out as a creative and customizable design, making it versatile for various body types and preferences. Kendyl shares helpful tips and encourages viewers to experiment with their measurements and adjustments for the best fit. Whether you’re new to crochet or an experienced maker, this tutorial has something for everyone!
Materials Required
- Yarn: Type not specified, but select a yarn suitable for summer wear based on personal preference.
- Crochet Hook: Size K or your preferred hook size.
- Optional Mannequin: For sizing and adjustments as you work.
- Scissors: For cutting excess yarn during finishing touches.
Step-by-Step Instructions
1. Starting the Base
- Begin with a slipknot and chain 62 (adjust based on sizing preferences).

- Decreasing begins right away: Turn your work, skip the first chain, and half double crochet in each loop thereafter.
- To create a triangular shape that flatters the midriff area, skip chains strategically while continuing your row.
![]()
2. Creating the “V-Shape”
- Fold the work in half to locate the center.
- Using half double crochet, work toward the center mark without stitch markers (eyeball placement as suggested by the tutor).
- Skip one chain at the center and resume crocheting to the opposite side to establish a “V-shape” in the middle, designed for cleavage.
![]()
3. Symmetry Setup
- Mirror the process on the opposite side to ensure symmetry.
4. Adding Support Details
- Switch to a treble crochet stitch to provide additional support (ideal for wearers with larger busts or those preferring a more structured fit).
- Chain 5 to begin this section, and treble crochet across for 2-3 rows.
- Skip 2 chains, wrapping the yarn around twice to establish the treble crochet stitch.
5. Adjusting to Fit Around the Neck
- For a fitted neckline, decrease at the top by skipping 3-4 chains and continue working in treble crochet.
- Add half double crochets to line the neck area for a clean finish.

6. Neck Straps
- Chain 20-25 stitches for neck straps (length depends on preference for neck fit).
- Work the other side similarly to create two straps that tie comfortably around the back of the neck.
7. Back Design (Shoestring Method)
- For connecting the back, use the shoelace technique:
- Chain 125-150 stitches (adjust based on required length).
- Lace up the chains as you would with shoelaces.
Special Features
- Versatile crochet top design with a flattering midriff triangle area and a striking “V-shaped” neckline.
- Enhanced support through treble crochet rows for wearers with varying bust sizes.
- Adjustable straps and laced-back closure for a tailored fit, ensuring the top is both stylish and functional.
Difficulty Level
- Beginner-to-Intermediate: The combination of basic stitches (half double crochet) and slightly advanced techniques (treble crochet and shaping through decreasing) makes this tutorial accessible but may require practice for new crocheters.
Tutor’s Suggestions
- Emphasis on Customization:
Kendyl recommends adding your own measurements throughout the process to ensure a perfect fit. She avoids exact counts and encourages experimenting with adjustments. - Use of Mannequin:
To simplify sizing, Kendyl suggests using a mannequin to tailor the design to your own (or a client’s) measurements. - Focusing on Comfort:
Always check the fit while working, using slip knots and chains to adjust as needed.
Uses
- Summer Wear: Perfect for warm weather with its breathable design and midriff-baring style.
- Day-to-Night Look: Dress it up with skirts or pair it with casual shorts for versatile styling.
- Custom Gifts: Make personalized tops for friends, clients, or family members.
Tip
When working on the shaping and decreasing sections, pause frequently to test the fit. Crochet is highly forgiving, and adjustments are easier when made in-progress rather than at the end.
Conclusion
This pattern teaches more than just the steps to create a top it inspires creativity and empowers makers to customize designs to suit their individual style and body type. As you finish your crochet project, you’ll be left with a piece that’s not only practical but exudes handmade charm.